DALI Emergency Reporting
Emergency group driver properties
The DALI emergency testing feature allows users to test emergency drivers and report on the status of the emergency drivers on the DALI network. This feature puts the emergency drivers into a test mode to confirm they operate correctly on battery power.
To access the Emergency Testing editor, select the top entry in the System/Building view tree, then click the Emergency Testing tab.
This editor includes the following functions:
-
Manage emergency fixtures
-
Start emergency tests
-
Query emergency test results
-
Test central battery systems (see Central Battery System Testing)
-
Generate emergency test reports
| CBS testing is also able to run emergency tests on standard DALI drivers. |
|
Routine network testing and reporting on a commissioned system is usually performed by System Manager. However, some emergency drivers include an automatic emergency self-test function that can interfere with SM testing. In this case we recommend setting Group Driver Properties > Automatic Test Properties > Functional test and Duration test to Disabled. Click the button to write these settings to the drivers for each emergency test group. 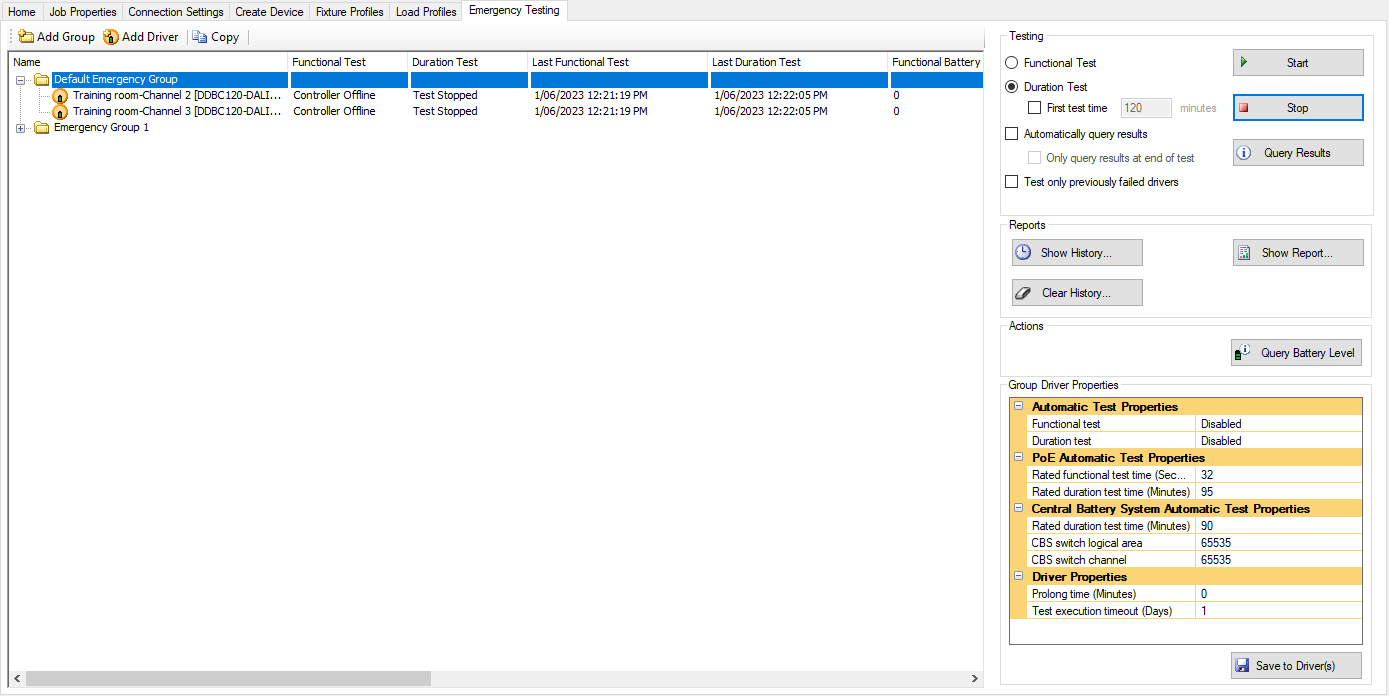
|
| System Builder and System Manager both have the capacity to run emergency tests. When triggered from System Builder, results are not stored in the System Manager database. We recommend using SB for initial testing, then SM for all regular maintenance testing after commissioning. |
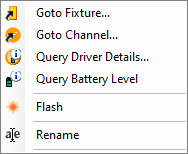
Right-click an emergency driver to open the context menu:
Group Driver Properties
|
Click the button after making any changes to these properties. These settings are not written to the drivers when selecting Save all modified devices or Save to device. |
| Property | Description |
|---|---|
Functional Test |
Enable/Disable the emergency driver functional test (disable for systems with System Manager) |
Functional Test Initial time |
Schedule the date and time for the next functional test. |
Functional Test Interval (Days) |
Enter the test interval in days before the next functional test |
Duration Test |
Enable/Disable the emergency driver duration test (disable for systems with System Manage |
Duration Test Initial time |
Schedule the date and time for the next duration test. |
Duration Test Interval (Weeks) |
Enter the test interval in weeks before the next functional test. |
| PoE Automatic Test Properties are not relevant for DALI emergency drivers. |
| Property | Description |
|---|---|
Prolong Time (Minutes) |
The delay after restoration of mains supply before ending emergency operation (switching from battery power back to mains). DALI standard is zero minutes. |
Test Execution Timeout (Days) |
The emergency test is terminated if the test is not completed within this period. |
Managing emergency drivers
System Builder automatically detects emergency drivers on the DALI network after enumeration. DALI emergency drivers can be detected at any time after enumeration by clicking the ![]() Query Driver Types icon in the Outputs editor.
Query Driver Types icon in the Outputs editor.
Drivers are organized into groups. You can ![]() Add,
Add, ![]() Copy,
Copy, ![]() Rename, and
Rename, and ![]() Delete emergency driver groups as needed.
Delete emergency driver groups as needed.
Newly detected emergency drivers are placed in the ![]() Default Emergency Group. You can then drag them into different groups so that emergency drivers located next to each other can be tested separately.
Default Emergency Group. You can then drag them into different groups so that emergency drivers located next to each other can be tested separately.

| Duration testing drains each driver’s batteries, so it is important to stagger the test schedules for groups of adjacent drivers. This ensures that each area still has illumination even if a real emergency occurs shortly after a duration test. |
-
You can either:
-
Click and drag emergency drivers from one group to another.
or
-
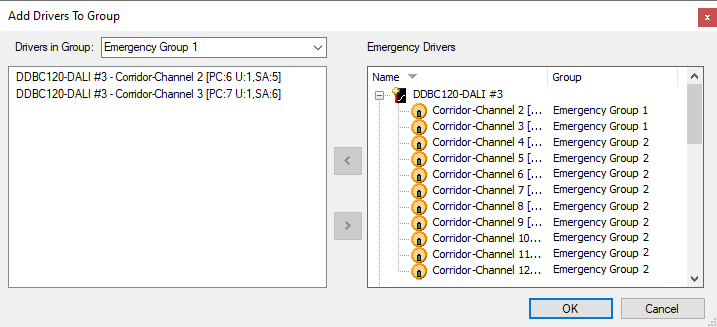
Select the destination group and click
 Add Driver to open the Add Driver To Group window.
 -
Expand the controller tree and select one or more drivers.
-
Click the and buttons to move drivers into and out of the selected emergency group.
Moving a driver out of the group adds it back to the  Default Emergency Group.
-
-
Click the button to confirm your changes and close the window.
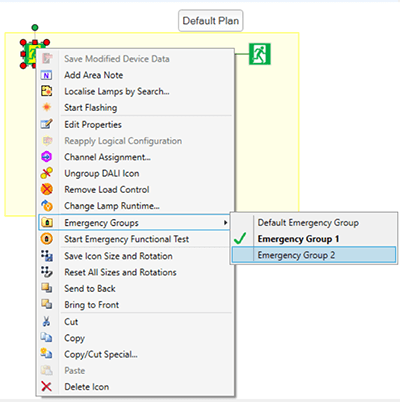
If you have emergency drivers assigned to a fixture icon, you can add these to an emergency group from the floor plan.
-
In the floor plan window, right-click the driver and select the required group from the
 Emergency Groups submenu.
-
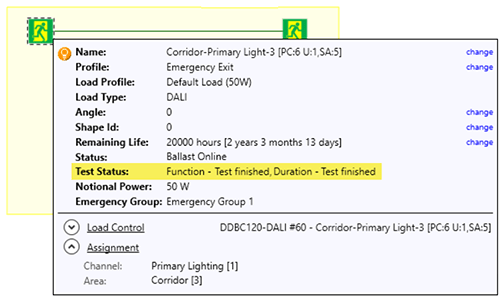
If a fixture or channel is in an emergency group, the mouseover tooltip displays the group name and the most recent functional and duration test status.
Testing emergency drivers
Emergency drivers are tested to check the driver is operating normally under battery power. Emergency driver testing can be performed on an individual driver or emergency driver group.
There are two types of emergency tests:
-
Functional Test - The system is placed into emergency mode for a short time to see if the drivers switch to battery power and that the battery switches the lights ON.
-
Duration Test - The system is placed into emergency mode for a longer period of time (as defined by the driver manufacturer), to see if the drivers switch to battery power and that the battery can maintain the lights ON. The duration test is run for a minimum of 90 minutes.
|
In many countries, emergency lighting standards specify that there should be a first emergency test after installation where the battery is duration tested for an extended time. When running a query for a first test, the user can select the |
-
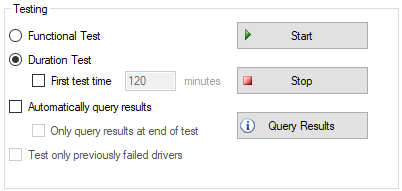
In the Emergency Testing editor, select the emergency group to test.
-
Select Functional Test or Duration Test.
-
If applicable, for the duration test, select
 First test time and enter the test duration in minutes.
 -
If applicable, select
 Automatically query results and
  Only query results at end of test.
 -
If applicable, select
 Test only previously failed drivers.
 -
Click the button.
-
Click the button to stop the test.
-
The button shows the tests results in the editor next to each emergency driver.
-
Name
-
Successful Functional Test
-
Functional Test
-
Successful Duration Test
-
Duration Test
-
Query Functional Test
-
Last Functional Test
-
Query Duration Test
-
Last Duration Test
-
Status
-
Functional Battery Level (%)
-
Firmware version
-
Duration Battery Level (%)
-
Runtime Failure
Reporting on emergency tests
The Reports section provides access to emergency test results and history.

-
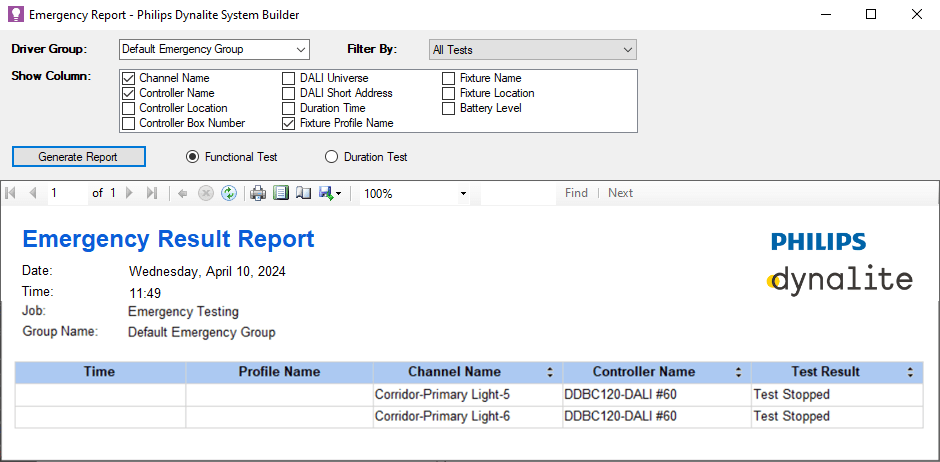
Click the button to open the Emergency Report window.
-
Click the Driver Group dropdown list and select an emergency group.
-
Click the Filter by dropdown list and select:
-
All Tests
-
Succeeded Tests
-
Failed Tests
-
-
Select the Show Column checkboxes that you want to display on your report.
-
Click the button. The report is displayed in the lower part of the window.
-
Select the required emergency group or driver.
-
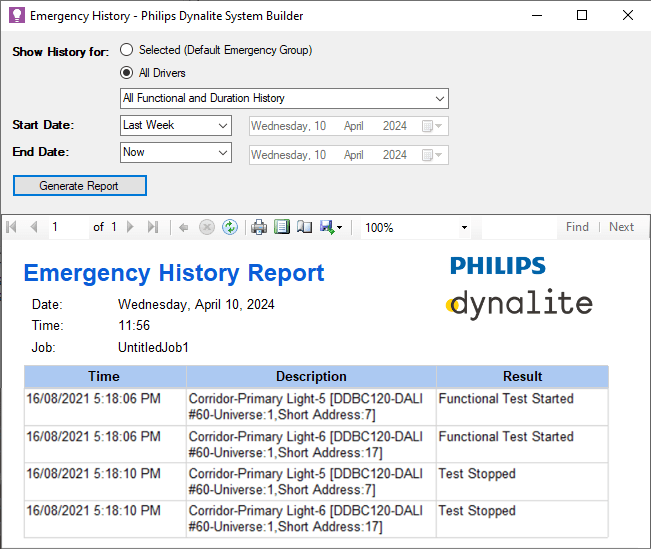
Click the button to open the Emergency History window.
-
Select Show history for:
-
Selected (emergency group name)
-
All Drivers
-
-
Select the type of report from the drop-down list:
-
All Functional and Duration History
-
All Functional History
-
All Duration History
-
Functional Results Only
-
Duration Results Only
-
-
Select the Start Date (Today, Last Week, Last Month, or a specified date) and End Date (Now or a specified date).
-
Click the button. The report is displayed in the lower part of the window.
-
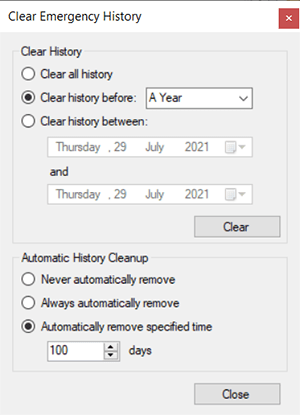
Click the button to display the Clear Emergency History window.
-
You can select to clear all history or clear history before a certain time period or between specified dates.
-
Click the button.
-
Set Automatic History Cleanup with one of the following options:
-
Never automatically remove
-
Always automatically remove
-
Automatically remove specified time after the selected number of days.
-
-
Click the button.
Emergency Driver Actions
The Actions section queries driver details and battery level.

-
Select an emergency driver.
-
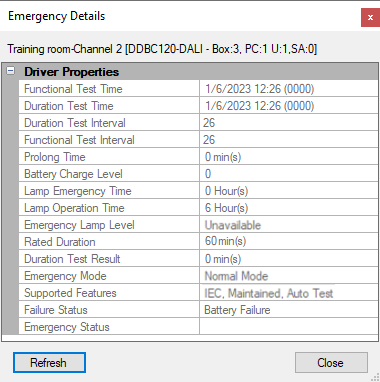
Click the button to display the Emergency Details window.
-
Select an emergency group or driver.
-
Click the button to populate the Functional Battery Level (%) and Duration Battery Level (%) columns for each driver.
