Day Rhythm lighting
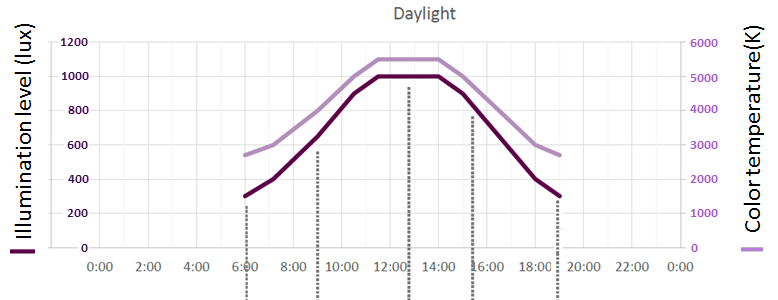
The Day Rhythm (bio-adaptive) lighting feature enables dynamic colour temperature and light intensity adjustment throughout the day to simulate the natural daylight cycle. This feature requires an EG, a DALI 209-compatible controller connected to tunable-white luminaires, and a DyNet sensor (if performing daylight harvesting at the same time).

The following editors are used to configure Day Rhythm feature:
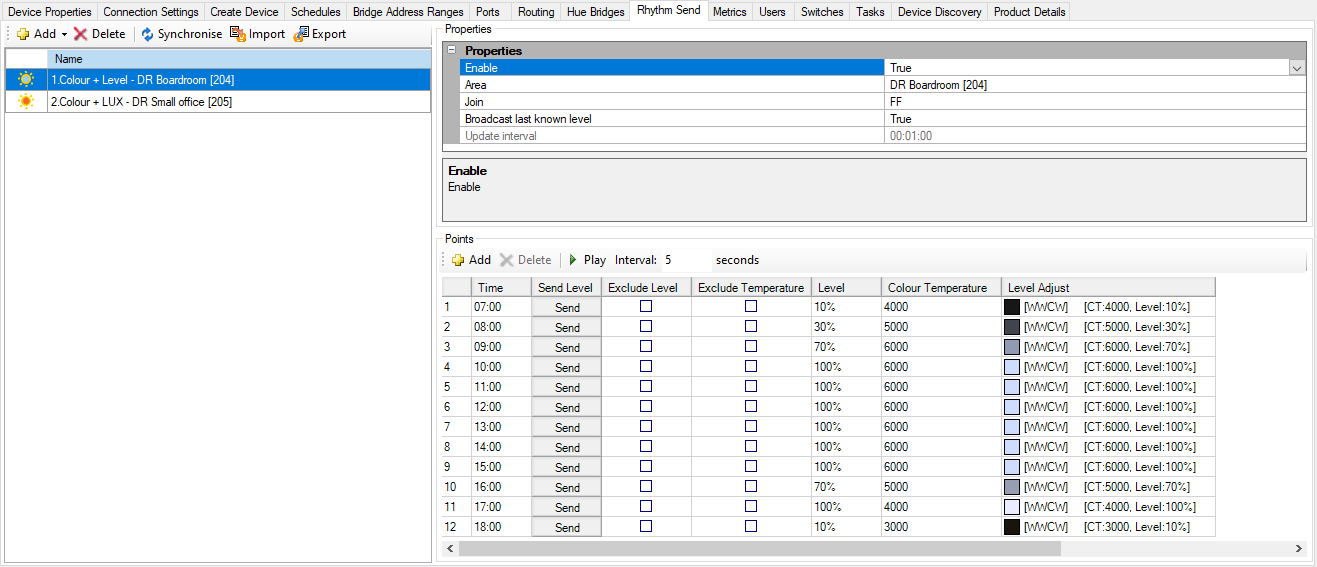
The Rhythm Send editor configures the Day Rhythm lighting curves in the EG. Up to five curves can be configured to simulate natural daylight colour temperature and intensity over the course of a day. Different curves can be used to cater for various seasons or wake-up times.
The Rhythm Receive editor selects the Day Rhythm curve messages received by DALI controllers and DyNet sensors.
The Outputs editor (in the area where you want to implement day rhythm), specifies the initial Day Rhythm curve number and the Day Rhythm Active Presets for drivers to follow a day rhythm curve.
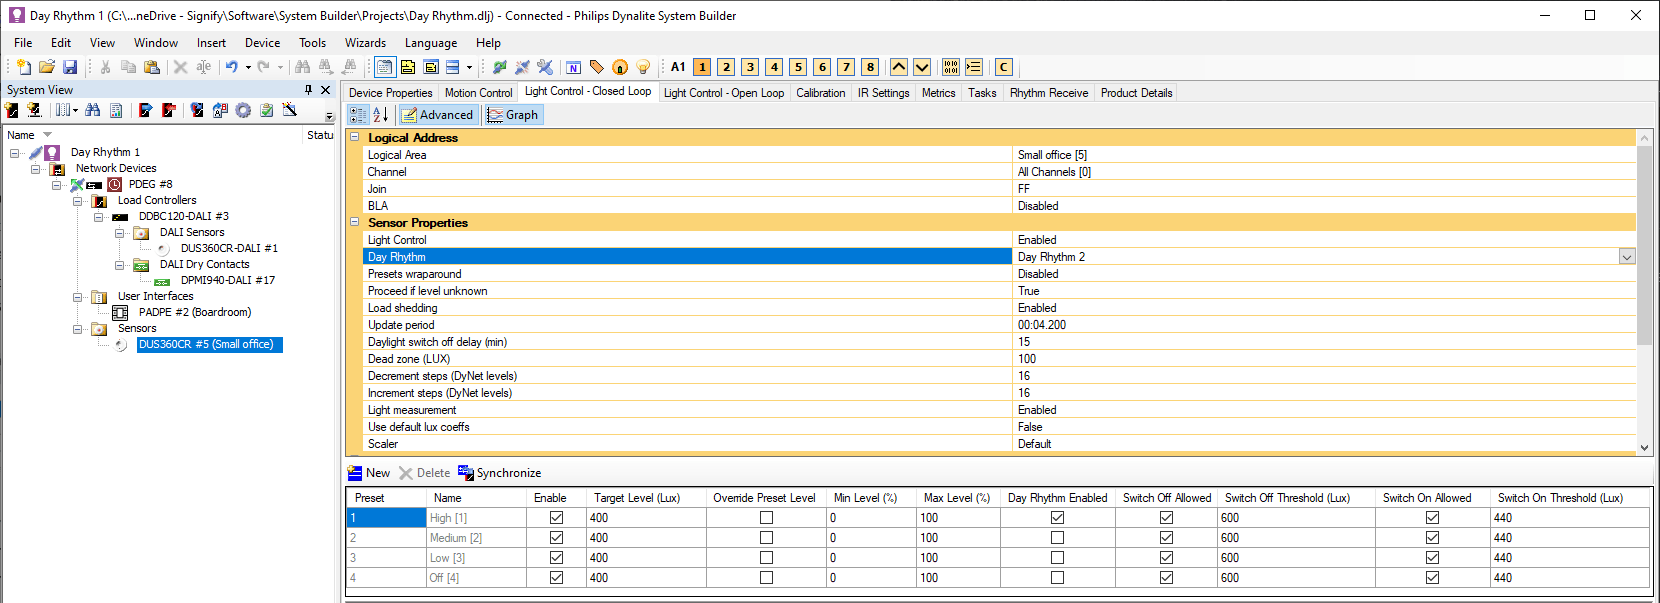
The Light Control - Closed Loop editor, specifies the Day Rhythm curve number and enables the Day Rhythm Active Presets for a sensor.
|
The default Day Rhythm curve for sensors and controller outputs is dynamically adjustable. You can schedule commands to change/enable/disable curves in a single area with the following commands:
|
When a ![]() Colour + Level Day Rhythm Curve is enabled, the EG sends a DyNet2 message once a minute, containing both the colour temperature and the channel level to DALI controllers.
Colour + Level Day Rhythm Curve is enabled, the EG sends a DyNet2 message once a minute, containing both the colour temperature and the channel level to DALI controllers.
When a ![]() Colour + Lux Day Rhythm Curve is enabled, the EG sends a DyNet2 message once a minute, containing the colour temperature to DALI controllers and a target lux level to sensors performing closed-loop light control (daylight harvesting).
Colour + Lux Day Rhythm Curve is enabled, the EG sends a DyNet2 message once a minute, containing the colour temperature to DALI controllers and a target lux level to sensors performing closed-loop light control (daylight harvesting).
-
Colour temperature range is 2500-7000K.
-
Channel level range is 0-100%.
-
Sensor lux range is 0-60000 lux.
A Day Rhythm Area Number for each curve links logical messages from the EG to the DALI controllers and DyNet sensors, so they can listen for the Day Rhythm Curve broadcasts.
A DALI controller receives a Day Rhythm message and if the specified channels in an area are in a Day Rhythm Active preset, the controller ramps their colour temperature and channel level according to the latest received values.
A sensor in an area receives a Day Rhythm message, and if the area is in a Day Rhythm Active preset, the sensor detects the amount of daylight and regulates the light intensity of the specified channels to achieve the latest received target lux level.
Colour + Level bio-adaptive lighting
|
Colour + Lux bio-adaptive lighting
|
|
-
In System view, select an EG and click the Rhythm Send tab.
The EG can only broadcast Day Rhythm messages to logical areas within its translation area range. -
Click
 Add and select
  Colour + Level or
  Colour + LUX.
A Day Rhythm curve (1 to 5) is added (Ensure that Enable is set to True). -
Select a day rhythm area where the DALI controllers and sensors can listen for day rhythm messages. You must select a different day rhythm area for each curve.
-
To keep broadcasting the curve levels between the last point of the day until the first point of the next day, set Broadcast last known level to True.
-
In the Points section, click
 Add to create up to 24 Day Rhythm Curve points.
Each new point’s Time defaults to one hour after the previous point.
-
Edit the properties for each point on the curve:
-
Time - Time of day specified for the selected point.
-
Exclude level - Current channel levels will not be altered at the selected point.
-
Exclude Temperature - Current colour temperature will not be altered at the selected point.
-
Level (Lux) - Channel level (or Lux) target at the selected point.
-
Colour Temperature - Colour temperature target at the selected point.
-
Level Adjust - Click to open adjustment sliders for channel level/lux level and colour temperature.
-
-
Press F12 or click
 Save to Device.
To run a test, enter the interval time and click .

You can click the button to detect and automatically create corresponding day rhythm curves with the matching day rhythm areas in the controllers (and sensors) under the gateway that support day rhythms.
In addition, you can select or to transfer day rhythm curves between projects.
The Rhythm Receive editor lets you select the same day-rhythm curves and areas configured in the EG so the controllers and sensors can receive the Day Rhythm messages from the EG.
-
In System view, select a DALI controller and click the Rhythm Receive tab.
-
Select a Day Rhythm curve and area that correspond to the curve and area configured in the EG
(you can skip this step if you clicked the button in the EG Rhythm Send editor).
-
In Areas view, select the area where the DALI drivers are assigned or click the Unassigned Devices tab to find the DALI controller and assign the drivers to the area where you intend to use Day Rhythm.
-
In Areas view, click the Outputs tab.
-
Right-click the heading row and select the following columns to be displayed:
-
Day Rhythm
-
Day Rhythm Active Presets
-
-
Click the Day Rhythm property for each driver channel and select a default curve (1-5).
-
Click the Day Rhythm Active Preset property for each channel and select the presets (1-16) where the day rhythm curve will be active.

-
Press F12 or click
 Save to Device.
 -
Select one of the Day Rhythm active presets for the required area. The relevant controller lighting channels will start displaying the light intensity and colour temperature as defined by your curve.
|
|
You must have configured an EG with a |
-
In System view, select a DyNet sensor and open the Device Properties tab.
-
Click to show more properties.
-
Select Device Logical Address > Logical Area and click the button to select the area where the sensor is located or, if you have a floor plan, you can drag the sensor from the device tree into the required area.
-
Click the Rhythm Receive tab.
-
Select a Day Rhythm curve and area that correspond to the curve and area configured in the EG
(you can skip this step if you clicked the button in the EG Rhythm Send editor).
-
Click the Light Control - Closed Loop tab and ensure that Light Control is Enabled.
-
In Sensor Properties > Day Rhythm default curve, select the curve that the sensor will follow.
-
In the Presets section, click to add a preset that the sensor will use for Day Rhythm.
-
Click to show more columns.
-
Select the Day Rhythm Enabled checkbox.
-
Press F12 or click
 Save to Device.
 -
Select one of the Day Rhythm active presets for the required area. The sensor will start regulating the lights and the relevant controller lighting channels will start displaying the target lux level and colour temperature as defined by your curve.
