Multi-Configuration Devices
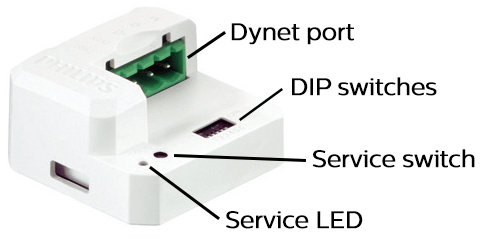
The DACM (v3 or later) can store multiple UI configurations that are manually selected using the DIP switches on the device. It is possible to store any combination of Antumbra and Revolution configurations on the same DACM.

This enables you to precommission DACMs with every required UI role (see note below) prior to installation, enabling the installer to easily select the correct configuration for each UI as they go.
| The number of configurations is limited by EEPROM capacity. Sites that require many UI configurations may need to split them across two or more sets of DACMs. |
Minimum Requirements
This feature requires a DACM v3 or later, with the latest available firmware.
Ensure that you are using the latest available version of System Builder.
Creating a New Multi-Configuration Device
-
Start by creating the required UI configurations in System Builder.
-
Click
 Insert Device from List (Ctrl+D) to open the Create Device editor, then open the User Interfaces tab and select UI Multi-Config FW 3.x to create a multi-configuration device.
In the Multi-Configuration editor tab, use the
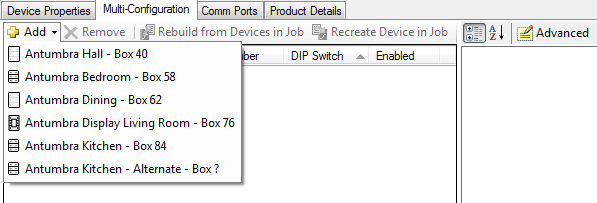
 Add button to add the required UI configurations to the device.
 Set the required properties for each configuration.
| Property | Description |
|---|---|
Name |
Defaults to the original device’s name, but can be changed. |
DIP switch |
This sets the DIP switch value (1-63) for the selected configuration. We recommend using easy-to-remember values, e.g., using 0x01, 0x02, 0x04, 0x08, 0x10, and 0x20 lets you recall up to six configurations by changing a single DIP switch to the ON position for each. |
Box number |
This is the spur box number that the device will have when the configuration is recalled. It defaults to the same box number as the original device in the job, but it can be changed. |
Saving to the Device
-
Set all DIP switches on the DACM to the OFF position, and connect it to the System Builder PC via the PC node or DyNet bus.
-
Use
 Load devices from network (Ctrl+L) and the service switch on the DACM to discover and add it to the SB job.
 -
Factory set the new DACM as a UI Multi-Config FW 3.x.
-
Copy (Ctrl+C) and paste (Ctrl+V) your multi-configuration to the new DACM.
-
Use
 Save to Device to upload your changes to the DACM.
If the DIP switches on the device are set to the value of any of your configurations, the device will restart with that configuration immediately after saving. -
Unplug the DACM, set the DIP switches to select a configuration, and connect an application module.
To see the DIP switch arrangement for a configuration, select it in the Multi-Configuration editor and click the Configuration > DIP switch > button. -
Reconnect the DACM to the network and test the button functions to confirm that the chosen configuration is working.
Synchronizing configuration updates from original devices
Click the ![]() Rebuild from Devices in Job button to synchronize the current settings of all the original devices in the job to the multi-configuration device.
Rebuild from Devices in Job button to synchronize the current settings of all the original devices in the job to the multi-configuration device.

Loading a multi-configuration device from the network or a hex file
If a multi-configuration device must be loaded from the network or from a hex file, the original devices will not be known. In this case the configurations each appear with a ![]() icon beside them, and an empty Original Device in Job > Name field.
icon beside them, and an empty Original Device in Job > Name field.

For devices in this state, it is possible to change the name, DIP switch, and Enabled settings, but not the box number.
To change the box number or any other device configuration, select the config you wish to edit and click the ![]() Recreate Device in Job button. The image below shows a recreated device. Note that devices are recreated without a box number.
Recreate Device in Job button. The image below shows a recreated device. Note that devices are recreated without a box number.

Now that the device exists in the job, you can change its configuration and then click ![]() Rebuild from Devices in Job to sync it back to the multi-configuration device.
Rebuild from Devices in Job to sync it back to the multi-configuration device.