Integration
In-room integration provides power outlet management, AV control, HVAC control, blind control, and window/door status detection. In-room integration only requires configuration of the room control devices.
System integration extends outside of the room to third-party network systems and requires configuration in each relevant gateway device or in the System Manager central monitoring and management software.
Integration gateways are generally deployed on the backbone network, meaning they are installed and configured to operate across many rooms. The PDEG (Philips Dynalite Ethernet Gateway) or DDNG485 (RS-485 Gateway) can facilitate two-way communication for integrated site-wide intelligence.
System Manager has system-level integration options for the following third-party systems:
-
Property Management Systems - Oracle Opera (ex. Fidelio) and Infor HMS
-
Access Control - Saflok and VingCard
-
Central HVAC Control - CoolAutomation
-
Building Management Systems – BACnet
PMS integration
Our system provides two-way communication with a Property Management System (PMS) using the FIAS protocol (Fidelio Interface Application Specification). System Manager acts as a gateway between System Manager and the PMS.
By integrating with a PMS, we can dynamically adjust room conditioning based on the room’s check-in status, conserving energy when the guest is checked out. We also synchronize room statuses such as DND/MUR and can send and receive wake-up requests. You can check the status of floor gateway connections and FIAS connections by clicking the ![]() globe icon in the top right corner of the dashboard.
globe icon in the top right corner of the dashboard.
Supported Actions and Commands
| Message Type | Oracle Opera | Infor HMS |
|---|---|---|
Occupancy |
|
|
Authorization |
|
|
Status |
|
|
From PMS
Guest Check-In
-
When a guest checks in, Opera notifies System Manager server so that the room conditions can be adjusted accordingly.
-
This status has a native matching command in Opera, their reference
GIunder the group Guest Data with variableRN(Room Number). -
Example command:
GI|RN2760(Room #2760, Guest Check In).
Guest Check-Out
-
When a guest checks out, Opera notifies the System Manager server so that the room statuses can be reset, and conditions adjusted to conserve energy between stays.
-
This status has a native matching command in Opera, their reference
GOunder the group Guest Data with variableRN(Room Number). -
Example command:
GO|RN2760(Room #2760, Guest Check Out).
To PMS
Do Not Disturb/Privacy
-
When the guest activates the DND status, either manually or through a linked scene (sleep-scene etc.), the status is synchronized with the Interact Multiroom Dashboard and sent to Opera.
-
This status has a native matching command in Opera, their reference
DNunder the group Room Data with variables ofY(Yes Active) orN, (Not Active). -
Example command:
RE|RN2760|DNY|(Room #2760, activate DND). -
If required, DND can also be mapped to the
RSfield.
Make Up Room
-
When the guest activates the MUR status, it is synchronized with the Multiroom Dashboard and sent to Opera.
-
This status has a native matching command in Opera, their reference
RSunder the group Room Data with a variable of1-6. Our system is mapped to the variables2(Dirty/Occupied) and4(Clean/Occupied) as the Active and Not Active states. We can also map the variables to other values as required by the hotel to match individual Opera configurations. -
Example command:
RE|RN2760|RS2|(Room #2760, activate MUR as ‘Dirty/Occupied').
FIAS
The PMS identifies rooms with a room number whereas SM identifies rooms with an area number. To map the data between the two systems requires a room mapping table. This is created in SB under File > Manage Room Profiles. System Manager can integrate with more than one FIAS system at a time. However, in SB the FIAS server can only be set to default. The FIAS server must be configured in SM.
-
Open
 System Manager Configuration.
 -
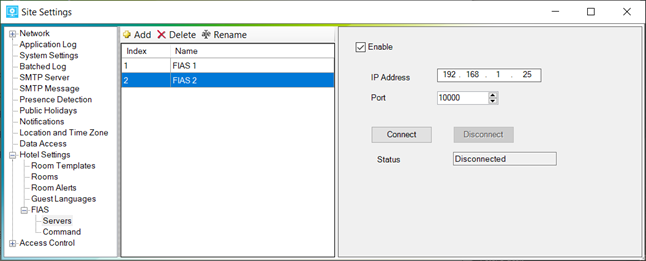
Click Site Settings > Hotel Settings > FIAS > Servers.
To create a secure FIAS connection, generate a certificate on the Oracle Fidelio server (use the IP address of the Fidelio server). In the Local Root certification path check the Certificate and the IP address. Export the certificate and place the certificate in the SM server Trusted Root Certificates store. -
Click
 Add for each FIAS Server and enter the IP Address and Port number.
You can also Delete and
  Rename the FIAS Server.
 -
Restart the Fidelio server and click the Connect and Disconnect buttons to test the connection.
-
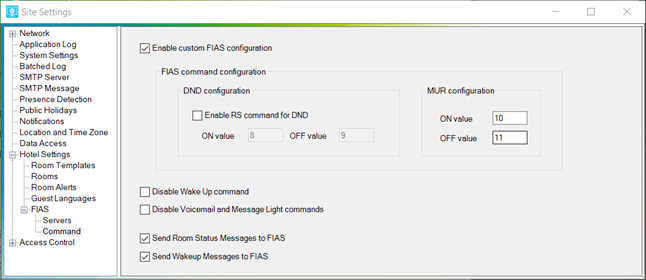
Click Site Settings > Hotel Settings > FIAS > Command.
-
If applicable, select the following checkboxes:
-
Enable custom FIAS configuration - Enter the DND/MUR > ON/OFF value as required.
-
Enable RS command for DND
-
Disable Wake Up command
-
Disable Voicemail and Message Light commands
-
Send Room Status Messages to FIAS
-
Send Wakeup Messages to FIAS
-
-
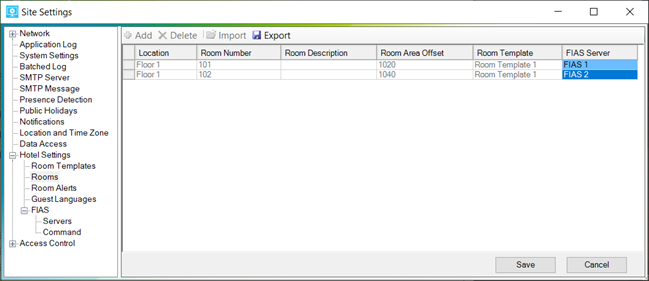
Click Site Settings > Hotel Settings > Rooms.
-
For each room, click the dropdown list in the FIAS Server column and select the appropriate FIAS server.
-
Click the Save button.
-
Send test commands from the Fidelio server and observe the changes on the dashboard. You can check messages in the
SM Configuration > Monitor System window.
DyNet has specific opcodes to enable the lighting control system to communicate over FIAS. System Manager passes the following messages:
Opcode |
DyNet Function |
4C |
Set Hotel Room Information |
4D |
Request Hotel Room Information |
4E |
Reply/Report Hotel Room Information |
In any Fidelio record, Room Number RN is an alphanumeric string up to 8 characters in length.
|
| Refer to DyNet public opcodes or DyNet2 opcodes spreadsheet for specific packet details. |
|
The following Infor Communications commands are not supported:
The following Infor Guest Data commands are not supported:
|
PMS translation table
| DyNet Sub-OpCode and function | Message direction | Fidelio record |
|---|---|---|
00 Do Not Disturb |
DyNet ← Fidelio |
RE (Unused. Translated by SM to Room Maid Status command.) |
01 Make Up Room |
DyNet → Fidelio |
RE |
02 Laundry Pickup Request |
DyNet ← Fidelio |
GI (Unused. Translated by SM to Room Maid Status command.) |
03 Message Light Status |
DyNet ← Fidelio |
RE |
04 Voice Mail |
DyNet → Fidelio |
RE |
05 Room Service Pickup Request |
DyNet ← Fidelio |
GI (Unused. Translated by SM to Room Maid Status command.) |
06 – 19 Reserved |
||
20 Room Maid Status |
DyNet → Fidelio |
RE Custom according to FIAS command configuration for DND, MUR. |
21 Room Alarm/Notification |
Not Applicable |
|
22 Room Wakeup Request (set wakeup alarm) |
DyNet ←→ Fidelio |
WR For Fidelio → DyNet, both date and time must be specified and valid. |
23 Room Wakeup Answer |
DyNet → Fidelio |
WA Fidelio Answer status: The DyNet message is sent from the device after the alarm has been actioned and the guest has been woken. It allows Fidelio to know that the guest has woken. |
24 Room Wakeup Clear (clear specific or clear all alarms) |
DyNet ←→ Fidelio |
WC To clear a specific wakeup alarm: To clear all wakeup alarms: |
25-39 Reserved |
||
40 Key Card Inserted |
Not Applicable |
|
41 Key Card Removed |
Not Applicable |
|
42 Guest Check In |
DyNet ← Fidelio |
GI Only the room number RN field is decoded. All other fields are ignored by SM. |
43 Guest Check Out |
DyNet ← Fidelio |
GO Only the room number RN field is decoded. All other fields are ignored by SM. |
Guest Info Change (Room Move) |
DyNet ← Fidelio |
GC Only the room number This record is translated into two separate DyNet messages - a check-out from the old room followed by a check-in to the new room. |
44-FF Reserved |
HotSOS/REX integration
Amadeus HotSOS/REX is a popular hotel operations software application that supports housekeeping, laundry, facilities, and other guest service teams. Integrating with Amadeus HotSOS/REX enables Interact to push certain room statuses and alerts into the hotel operations system to help staff deliver guest services.
Interact synchronizes the following room statuses with the HOTSOS server:
| Interact | HOTSOS/REX |
|---|---|
Privacy (Do Not Disturb) |
DND Make Up Room |
MakeUp Real-time Occupancy |
GuestInRoom |
-
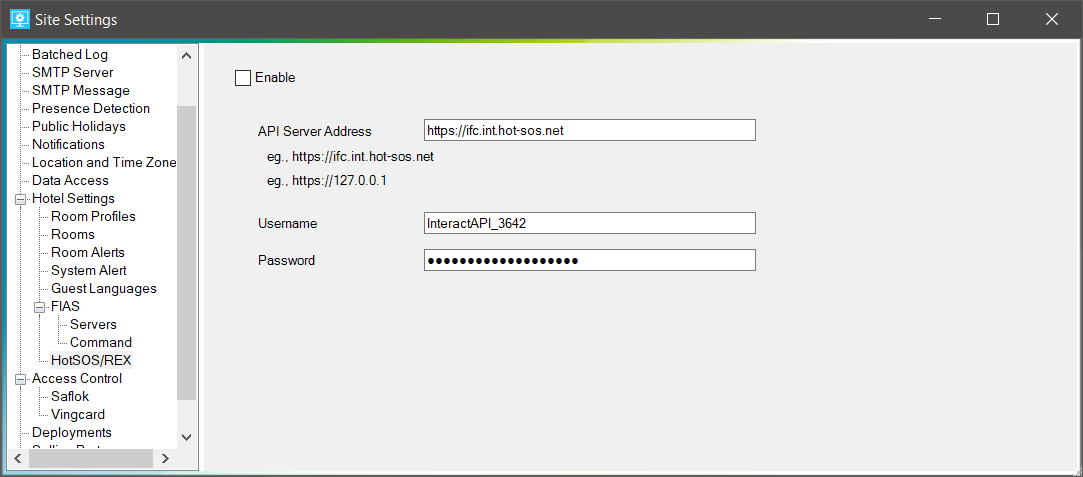
Open Site Settings > System Settings > Hotel Settings > HotSOS/REX.
-
Enter the HotSOS API Server Address.
-
Enter a Username and Password.
-
Select the Enable checkbox to start sharing status messages.
| The HotSOS specification requires numeric room names. Events in SM for rooms with non-numeric names are not sent to the HotSOS server. |
| Room states are monitored after the room linking logic, so updates sent to HotSOS include room linking. |
| Errors, warnings, and info are logged to the SM log. If the HotSOS server certificate is invalid or not trusted by the SM machine, it can be seen in the Detail column. If you see errors, you need to install the HotSOS public certificate into the Windows Trusted Certificate Store. |
Saflok integration
Saflok integration enables room access control and monitoring. You must select the checkbox for Access Control > Saflok when installing System Manager. Selecting Saflok provides an additional IIS Server web service site. Ensure the enabled authentication configuration for the Philips Dynalite Saflok site in IIS matches the authentication provided by the Saflok server. Saflok is a client of Interact.
Saflok reports on the following door events:
| OpCode | Sub-OpCode | Command |
|---|---|---|
4C |
80 |
Door Guest Entrance |
4C |
81 |
Door Staff Entrance |
4C |
82 |
Door Inside Open (Generic egress) |
4C |
83 |
Door Deadbolt Thrown |
4C |
84 |
Door Deadbolt Released |
4C |
85 |
Door Closed |
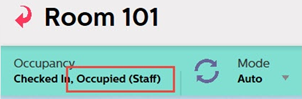
A Door Guest/Staff Entrance message needs to be followed up with an Occupancy message from the room so that the room tile will change to Occupied (Guest) or Occupied (Staff).
On the Multiroom Dashboard Room View page, access control events are shown in the Event Timeline and the occupancy status is shown in the room status bar.
-
Open Site Settings > System Settings > Hotel Settings > Saflok and set the Entrance door events based on door open and closed messages checkbox to False.
-
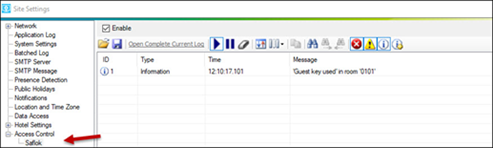
Open Site Settings > Access Control > Saflok. This page shows a monitor window to display access control events.
-
Select the Enable checkbox.
-
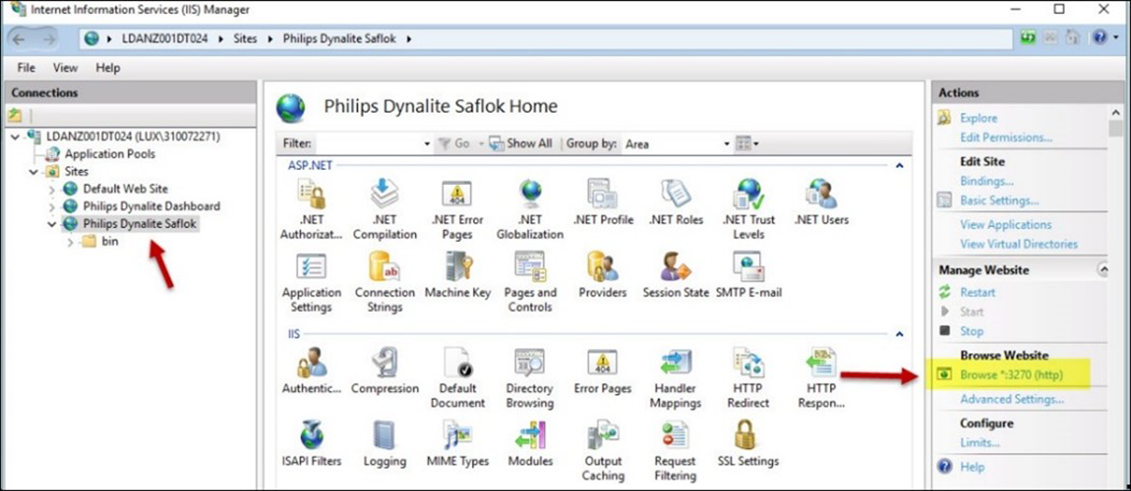
For the Saflok server, configure the subscription URL in the HOTEL LENS application using the following format:
\http://[hostname]:[port]/api/EventNotification-
[hostname] = IP address of the SM server.
-
[port] = 3270
-
Webservice = REST Protocol.
-
VingCard integration
VingCard integration enables room access control and monitoring. Interact is a client of VingCard. SM makes long poll HTTP(S) API calls to the ASSA ABLOY (Visionline) server and VingCard reports on the following door events:
| OpCode | Sub OpCode | Command |
|---|---|---|
4C |
80 |
Door Guest Entrance |
4C |
81 |
Door Staff Entrance |
4C |
82 |
Door Inside Open (Generic egress) |
4C |
83 |
Door Deadbolt Thrown |
4C |
84 |
Door Deadbolt Released |
4C |
85 |
Door Closed |
A Door Guest/Staff Entrance message needs to be followed up with an Occupancy message from the room so that the room tile will change to Occupied (Guest) or Occupied (Staff).
On the Multiroom Dashboard Room View page, access control events are shown in the Event Timeline and the occupancy status is shown in the room status bar.
-
Open Site Settings > System Settings > Hotel Settings > VingCard and set the Entrance door events based on door open and closed messages checkbox to False.
-
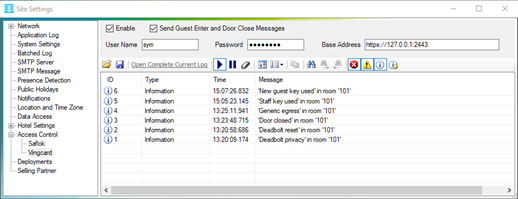
Open Site Settings > Access Control > VingCard. This page shows a monitor window to display access control events.
-
Select the Enable checkbox.
-
Select the Send Guest Enter and Door Close Messages checkbox ONLY if there are no door switches on the entrance doors.
The room controller sends Door Guest Entrance and Door Closed DyNet messages when the door switch detects the door open/closed. With VingCard integration these events are also sent out from SM when notified by VingCard. To prevent this issue, Send Guest Enter and Door Close Message is disabled by default. Only if a hotel does not install door switches on hotel room doors and has VingCard integration would this setting be enabled. Staff Guest Entrance is always sent out with VingCard integration. -
Enter the following information to connect SM to the VingCard server:
-
Username
-
Password (encrypted by the application)
-
Base Address and Port number
-
-
Install the Visionline software and log in to Visionline using the default System Manager credentials "sym" and "sym". Ensure the ASSA ABLOY consultant maps the doors to the hotel room numbers, i.e. View > Doors.
Changing VingCard port number
VingCard recommends installing the server on a separate machine. In that case, there should be no need to change the port number.
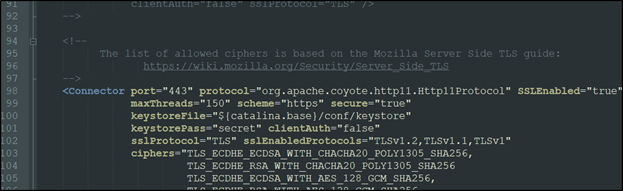
When installed on the SM Server machine, the default VingCard port number 443 conflicts with the Dashboard, which uses the same port number 443. You must change the VingCard server to a different port number such as 2445.
-
Open the following file in a text editor:
C:\ProgramData\ASSA ABLOY\Visionline\webserver\tomcat\conf\server.xml -
On line 98, change
443to another port number such as2445
-
Add a firewall rule to allow messages from this port number.

-
Restart the server machine after editing the file to load the configuration changes.
Establishing a secure connection to VingCard
For System Manager to trust the VingCard server, it must have a valid TLS certificate and the SM Server machine must have the certificate imported into its certificate store. This can be done with either a self-signed certificate (described below) or with a CA certificate. The VingCard server comes by default with a self-signed certificate, but it is recommended to replace that with one generated specifically for the site.
| If VingCard is already installed in the hotel by a VingCard professional, then it may already be set up with a valid SSL certificate and that certificate would already be trusted by Windows. In this case you only need to complete the final two testing steps below. |
-
Install VingCard server.
-
Create a java keystore for the server to access.
VingCard installation comes with its own copy of java’s keytool.-
Open
cmd.exeand run the command
cd C:\ProgramData\ASSA ABLOY\Visionline\webserver\jre\bin -
Run the command below (set your own values for the items in bold):
keytool -genkey -keyalg RSA -alias mykeyalias -keystore keystoreIAH.jks -storepass strongpassword -validity 7300 -keysize 2048 -dname "CN=172.27.89.23" -ext "SAN=IP:172.27.89.23,IP:127.0.0.1" -
Press Enter to accept key password is same as keystore password.
-
If your VingCard server is on the same machine as SM, then you only need one subject alternative name. Change the last part to
-ext "SAN=IP:127.0.0.1”.
-
-
Export certificate from the keystore.
-
Run the command below (set your own values for the items in bold to match the values used in the previous step):
keytool -export -alias mykeyalias -keystore keystoreIAH.jks -rfc -file X509_certificate.cer -
You will be prompted for the keystore password.
-
-
Set up Apache Tomcat to use the new keystore.
-
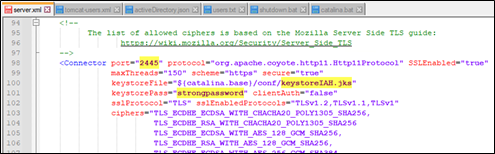
Copy keystoreIAH.jks to
C:\ProgramData\ASSA ABLOY\Visionline\webserver\tomcat\conf\ -
Edit the highlighted items in this file:
C:\ProgramData\ASSA ABLOY\Visionline\webserver\tomcat\conf\server.xml
-
-
Import the certificate to Windows certificate store.
(We recommend doing the remaining steps on the VingCard machine first, as a test.)-
Copy the file X509_certificate.cer to the SM Server machine.
-
Double-click the certificate in Windows Explorer (if prompted, choose to open with Crypto Shell Extensions).
-
Click Install Certificate…
-
Select Store Location = Local Machine (you need admin rights for this) and click Next.
-
Select Place all certificates in the following store = Trusted Root Certification Authorities and click Next and Finish.
-
-
Restart the VingCard machine to load Tomcat configuration changes.
-
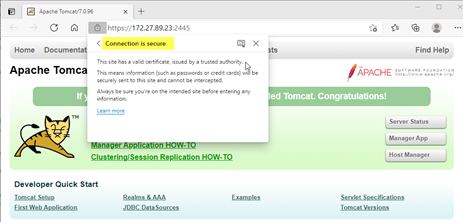
Test in a browser.
-
Point a browser to the VingCard server IP address (e.g.
https://172.27.89.23:2445).
Use Chrome or Edge for this step, as Firefox has its own certificate store. -
Make sure the IP/port is not blocked by the firewall. You should see the Tomcat server homepage with a valid secure connection.
-
-
Check that SM is connected to the VingCard server.
-
You may need to restart SM Server to confirm the changes to the certificate store.
-
Check the log in
System Manager Configuration - you should not see this error.

-
CoolAutomation Integration
Integration with the CoolAutomation HVAC control system enables centralized and in-room HVAC control and monitoring. Integration is performed with a CoolMasterNet bridge in combination with dedicated HVAC Ethernet gateways and AntumbraDisplay user interfaces.
| One CoolMasterNet gateway can support up to 6 simultaneous TCP connections. If there are more than six Ethernet gateways to be connected, add more CoolMasterNet gateways or consult with a CoolMaster technician to overcome this limitation. |
| Only one-way communication is possible in the current CoolMaster task template. Any changes made to HVAC settings outside of the AntumbraDisplay will not be updated in the panel. |
| The task template can work in both PDDEG-S and PDEG Ethernet gateways. |
-
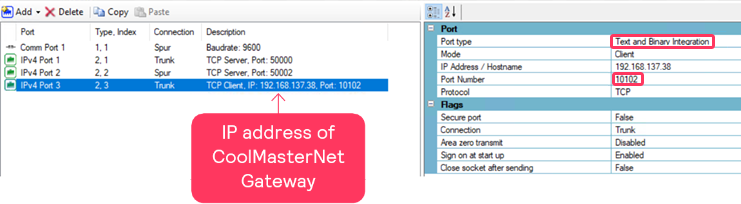
In the PDDEG-S/PDEG Ports Editor, click
 Add > IPv4 port and select the following:
-
Port type: Text and Binary Integration
-
Mode: Client
-
IP Address: The supplied address for the CoolMasterNet gateway.
-
Port Number: Unless specified otherwise, 10102 is the CoolMasterNet gateway default.
-
Protocol: TCP
-
-
Open the master job file and select a floor gateway. Then in the Tasks Editor click
 Select Task Template and choose IAH-Coolmaster Integration-PDEG.evt.
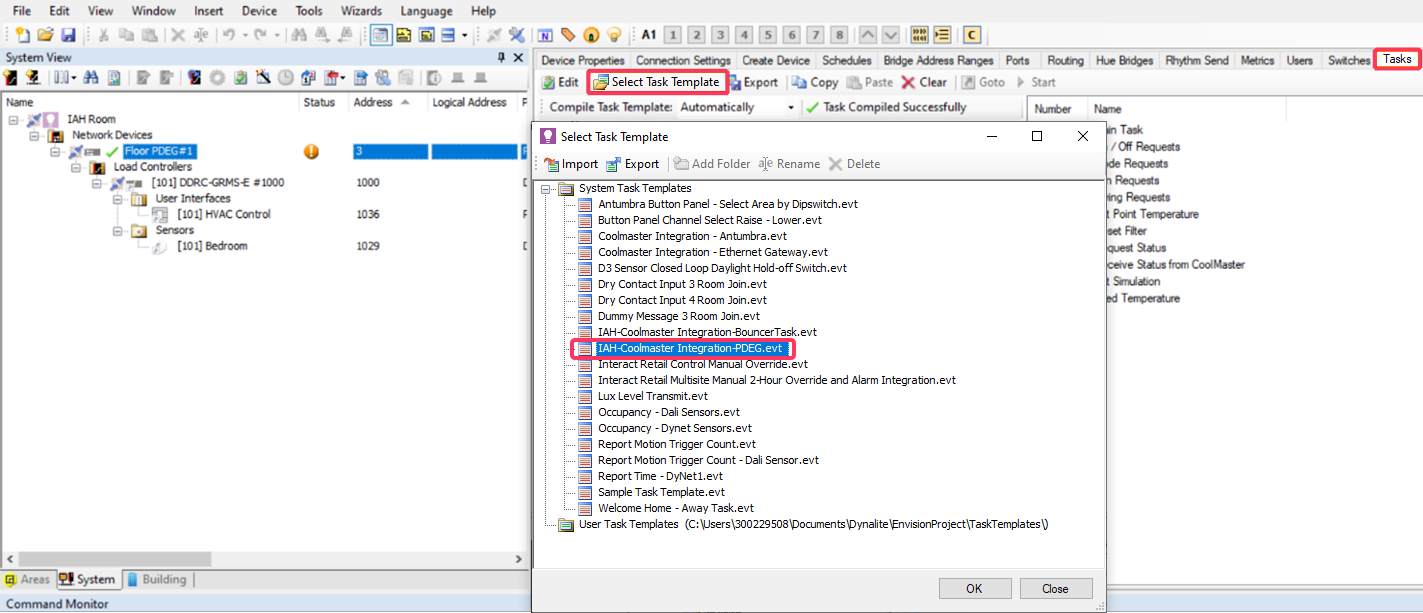
IAH-CoolMaster task templates are available in System Builder from STR/Multiroom v2.3 (System Builder v3.31.8) onwards. Ensure that you choose the correct IAH-specific task template, not the Coolmaster task template for Dynalite projects. -
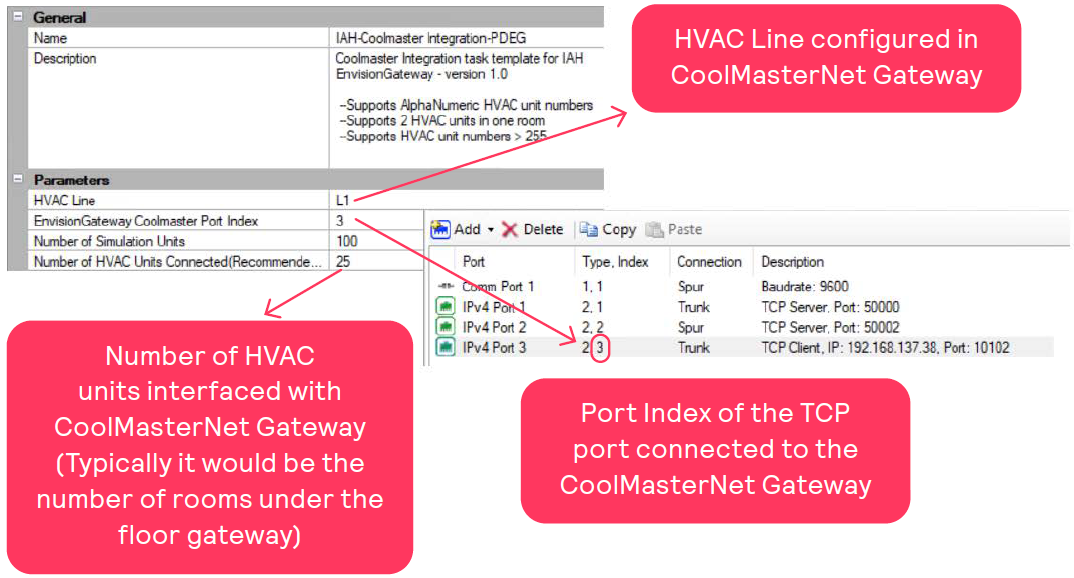
In the task template, under Parameters, enter the HVAC Line configured in the CoolMasterNet gateway, Port Index of the TCP port created in the PDDEG-S/PDEG that is connected to the CoolMasterNet gateway, and the Number of HVAC Units mapped for integration.
-
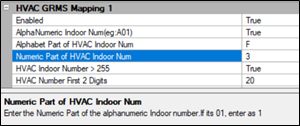
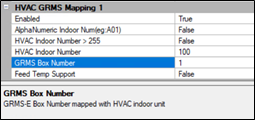
In the HVAC GRMS Mapping [unit number] section, enter the following details:
-
Enabled: True - enables mapping and opens the related configuration settings.
-
AlphaNumeric Indoor Num:
-
False if HVAC unit number is only numeric.
-
True if HVAC unit number is alphanumeric (e.g A01, F04, etc.), enabling two new properties:
-
Alphabet Part of HVAC Indoor Num
-
Numeric Part of HVAC Indoor Num
-
e.g. if the unit is F03, enter F and 3 in the respective fields. 0 does not have to be specified.
-
-
-
-
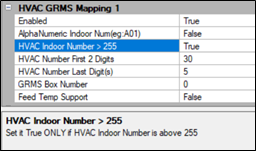
Set HVAC Indoor Number > 255 to:
-
False if HVAC unit number is below 255.
-
True if HVAC unit number is above 255 (2 bytes), e.g. 301, 505, 515 etc.
As the task can only handle 1-byte values for processing, numbers over 255 must be split and entered as First 2 Digits and Last digit(s) (everything after the first two digits).
-
-
HVAC Indoor Number: If the HVAC Indoor number is not alphanumeric and the value is below 255, enter the value directly in this text field.

-
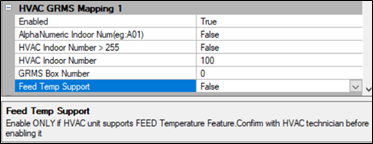
GRMS Box Number: Each HVAC unit will be mapped to the corresponding room via the GRMS box number. Enter the GRMS box number for the room that is connected to the HVAC unit number mentioned in the previous steps.
-
Feed Temp Support: True ONLY if the HVAC unit supports and uses the temperature recorded by third-party sensors such as Antumbra.
-
Configure bouncer tasks in one of the room devices to convert the STR-specific HVAC control preset messages to channel level messages that are used in the CoolMaster template.
-
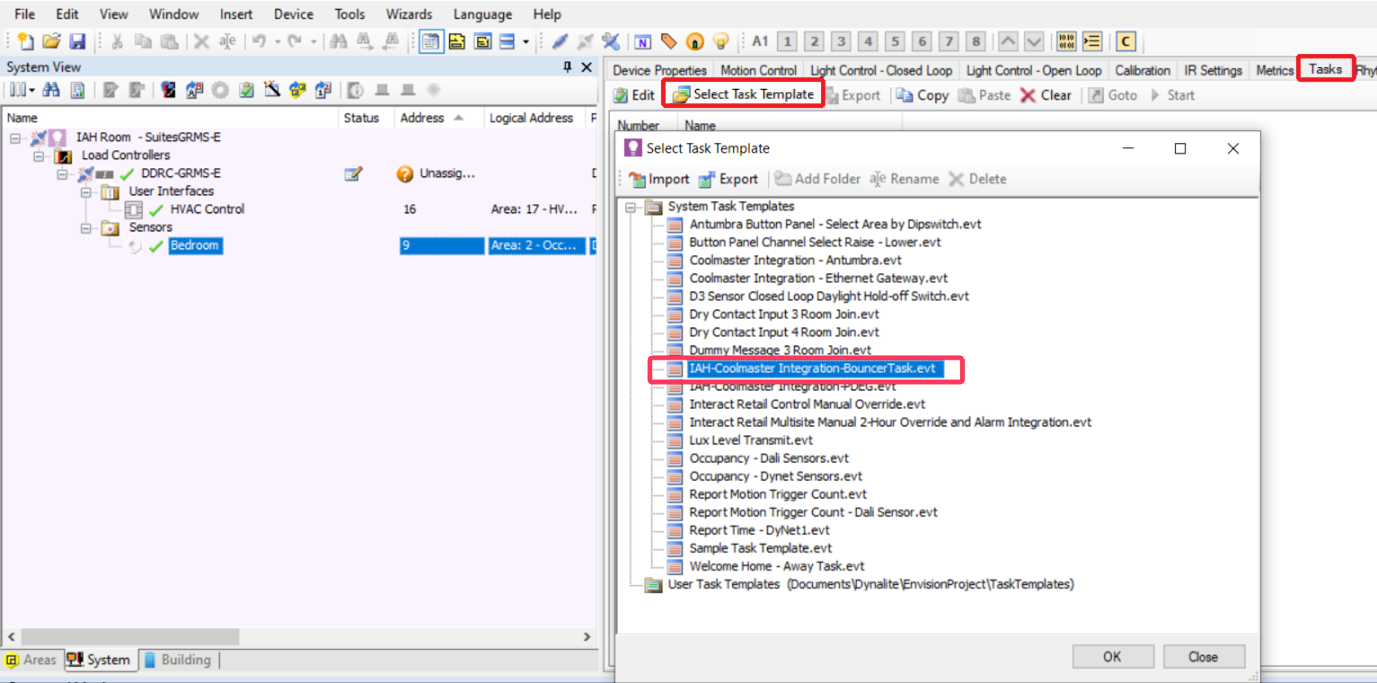
Open the room profile job file and select one of the room devices other than the HVAC Antumbra Panel - preferably a device with no other tasks running on it.
In the example shown below, the bouncer tasks are copied to the bedroom sensor. -
Select the device, then in the Tasks editor, click
Select Task Template and choose IAH-Coolmaster Integration-BouncerTask.evt.
-
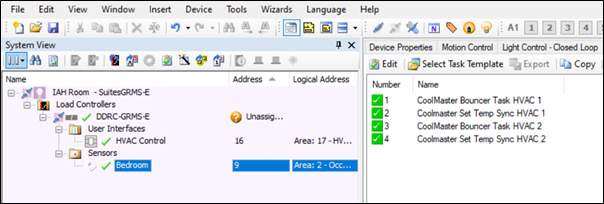
The task will convert the Multiroom HVAC preset messages to CoolMaster-specific channel level messages.
Also, setpoint temperature changes from the Multiroom Dashboard will be forwarded to the CoolMasterNet gateway.
-
Repeat this procedure for each room using CoolMaster integration.
-
BMS integration
To integrate System Manager with building management systems such as HVAC and power, or link to networked systems, we provide a range of open protocol and proprietary integration options including BACnet, Modbus, and CoolAutomation.
BACnet
BACnet integration allows the BMS to trigger tasks and time-based events by recalling presets in the Multiroom system, and enables the system to report current system status to the BMS.
The BACnet gateway provides:
-
Read/Write access for preset control, channel level control, and HVAC temperature control.
-
Read access for HVAC temperature reporting, sensor light values, DALI driver status, and device status.
For more information refer to: