Task Template Configuration
The main GRMS task template controls almost all the interactions present in the room and must be configured and customised for your project.
It is structured in such a way to make updating between versions as simple as possible.
First you will configure the front-end options via dropdown menus, then you will edit the project-specific tasking.
Front-End Options
The GRMS Task Template has a front end made up of drop-down menus and fields to customise the tasking for your project.
The first step is to activate the features you need for your project. This will show/hide other configuration settings based on which features you are using. Set any feature you plan to use to True.
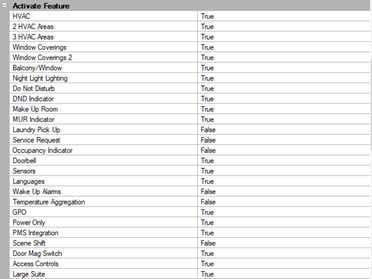
Core Features
-
HVAC – 1, 2, or 3 zones of HVAC
-
Window Coverings – 1 or 2 of curtains, blinds, etc. per location
-
Balcony/Window Contacts – Sensors or contacts that detect a window or balcony opening to turn off HVAC.
-
Nightlights – Any type of automation related to nightlights including AntiStumble.
-
Room Statuses – Do Not Disturb, Make Up Room, Room Service, Laundry Pickup.
-
Room Status Indicators – Indicators on a corridor panel to inform staff to the state of the room.
-
Doorbells – Audible and/or Visual doorbells controlled by the system.
-
Languages – Support for multiple possible languages on displays.
-
Wake-Up Alarms – Wake up lighting sequence.
-
Temperature Aggregation – The ability to aggregate temperature readings from several locations in a room to get a more accurate temperature.
-
GPO – General Purpose Outlets or Plug Load control of guest accessible outlets in the room.
-
Power Only – Outputs that are controlled solely based on occupancy and have no control points.
-
PMS – Integration with Property Management Systems to get Check In data.
-
Scene Shift – Automatically offset lighting presets at nighttime.
-
Door Mag Switch – A reed switch on the door to show when it opens and closes.
-
Access Controls – Integration with access control system to know guest vs staff entry.
-
Large Suite – Rooms with more than 3 HVAC zones
The video below (direct link) demonstrates the process in more detail:
Once you have chosen which feature you are using on your project you will configure settings for all the features you have activated. Settings for unused features will be hidden.
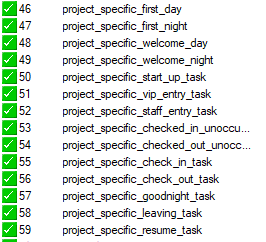
Project-Specific Tasking
Every Multiroom project requires some level of customisation. This mainly applies to welcome scenes that are specific to the channels and areas used in each room type. However, projects often have other eccentric requirements related to check-in or some other event in the room.
To provide for this customisation we have built the STR GRMS Task Template with project-specific tasks. Core features are managed by general tasks, and when finished they trigger the project-specific versions.
|
Editing only the project-specific tasks simplifies upgrading, troubleshooting, and getting support for your project. Editing any part of the template outside of the project-specific tasks runs the risk of causing core features to malfunction. You have been warned… |
Project-specific welcome tasks come preloaded with some common commands but should be considered blank slates, which you will need to customize with whatever sequence of messages you want to occur on guest entry. If you do not plan on using all of them, fill out the Welcome Day task and have the rest of the welcome tasks simply start that task.
Every project must have at least a first entry welcome scene to set default guest lighting settings.
There are also many blank task slots that can be used for any other customization your project requires.
For more information watch the video below (direct link) that explains how to set up your welcome scenes:
Project-Specific Persistent Memories
Many of the task templates included in the STR Tasking Library have persistent memory sheets required for them to function. On the GRMS and DDFCUC avoid using any named memory locations or ones marked as reserved.
In the GRMS main task template there are some persistent memories that must be edited.
5 |
Welcome Scene Behavior |
6 |
Timeout for Welcome scene mode 4 |
10 |
Card Drop Setting (0=sensor, 1=Card drop) |
20-25 |
Checked Out Unoccupied HVAC and Window Covering Settings |
30-35 |
Checked Out Occupied HVAC and Window Covering Settings |
40-45 |
Checked In Unoccupied HVAC and Window Covering Settings |
50-55 |
Default Guest Day HVAC and Window Covering Settings |
64-65 |
Default Guest Night Window Covering Settings |
69-71 |
Green Mode HVAC Settings |
Memories 200-254 are set aside for project-specific use.
Large Suites
The bulk of the inventory in a hotel will be 'standard' rooms, but many projects include larger suites with multiple bedrooms and HVAC zones.
The standard offset for a room is an allocation of 20 areas, but large suites often require many more lighting areas.
| Take care to avoid overlapping areas when you map out these larger suites. We strongly suggest that you put them at the lower numbers of the floor. |
Because we use Area 16 as the Base Link Area for all automated lighting commands outside of welcome scenes, it doesn’t matter how many lighting areas you add or use.
Similarly, because all window coverings are in Areas _6 and 7, this functionality is easily scalable.