Configure Dynamic Step Over
Configure Dynamic Step Over Relationships
Area Cascading areas can be created directly on the floor plan, which shows the relationships between the configured areas.
Click the ![]() icon to show Area Cascading areas on the floor plan. As the cursor hovers over each area, they are dynamically shaded in contrasting colours to show their Area Cascading relationships.
icon to show Area Cascading areas on the floor plan. As the cursor hovers over each area, they are dynamically shaded in contrasting colours to show their Area Cascading relationships.
-
Draw the Step Over Areas.
-
Right-click on the background area and select
 Area Cascading >
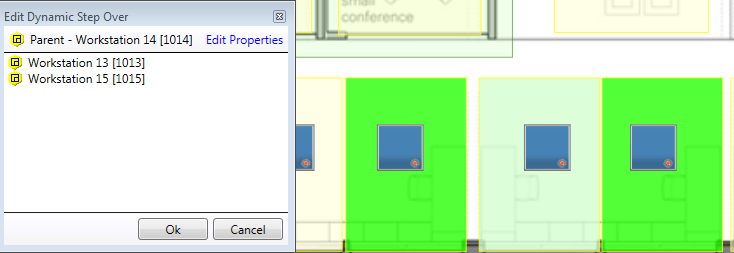
  Add Dynamic Step Over to open the Edit Dynamic Step Over dialog.
 -
Click on each area on the floor plan that you want to make a Dynamic Step Over area. Selected areas are shaded in pink on the floor plan and added to the dialog list.
-
After selecting all required areas, click the button.
-
To edit Dynamic Step Over, right-click a configured area and select
 Area Cascading >
  Edit Dynamic Step Over to open the Edit Dynamic Step Over dialog.
Configure Dynamic Step Over Properties

|
Standard properties are shown in bold. Advanced properties are shown in bold italics. Initially only the basic fields are shown. To reveal all fields, click the button. |
| To standardise all sensor properties first, apply the Step Over Area template to all areas that will have the Dynamic Step Over function. |
-
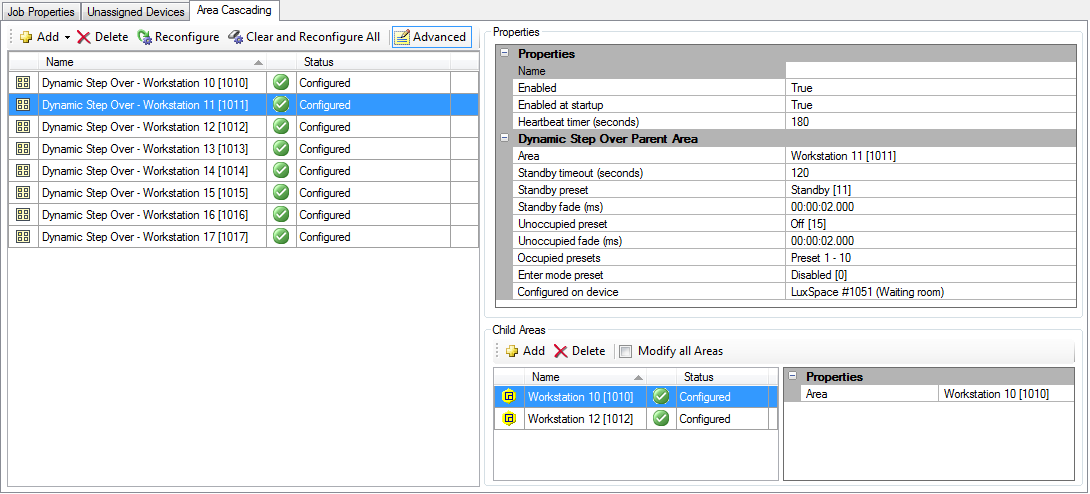
Select the job name in the Areas View tree and click the Area Cascading tab, or click Tools >
 Area Cascading Editor.
 -
Click
 Add >
Add >  Dynamic Step Over.
 -
In the Properties section:
-
Enter a Name for the Dynamic Step Over function
-
Set Enabled to True to enable the Dynamic Step Over function. You can also set this to False to temporarily disable the function without deleting it.
-
Set Enabled at startup to True if required. You can set this to False to leave it disabled initially and enable later by using a DyNet message.
-
Enter a value for the Heartbeat timer (seconds).
This property sets the interval between child area notification messages (current occupancy state) to the parent area. Only one child area will send the heartbeat, as child areas reset their heartbeat timer when they see a notification message from another child area.
The heartbeat timer should be shorter than the no-motion timeout of the parent area.
-
-
In the Dynamic Step Over Parent Area section:
-
Select the Area for Dynamic Step Over. Click the button to select a different area.
-
Set the Standby timeout (seconds). This determines how long the parent area waits after receiving the last notification message from a child area before it recalls the unoccupied preset.
-
Select the Standby preset. When a notification message is received from a child area, the parent area recalls this preset.
-
Enter the Standby fade (ms). This is the fade time when the parent area recalls its Standby preset.
-
Select the Unoccupied preset. The parent area recalls this preset if the Standby timeout expires without receiving a notification message from a child area.
-
Set Unoccupied fade (ms). This is the fade time when the parent area recalls its Unoccupied preset.
-
(Optional) Select an Enter mode preset that can trigger the Dynamic Step Over function in the parent area. It is added to the list of unoccupied presets for the parent area.
-
Select the Configured on device that has to be configured for Dynamic Step Over properties.
This is automatically set to the most appropriate device available in the area for Dynamic Step Over, but you can click the button to open the Device Selection dialog. The Items column indicates the number of available Area Cascading Object slots in each device’s memory.
-
-
In the Child Areas section:
-
Click
 Add to open the Area Selection dialog and add one or more child areas for the Dynamic Step Over function.
 -
Select the child area(s) from the list and click .
-
Select a child area and check/configure the following Properties:
-
Area - The name of the child area.
-
-
|
You have now configured the parent and child areas for the Dynamic Step Over function.