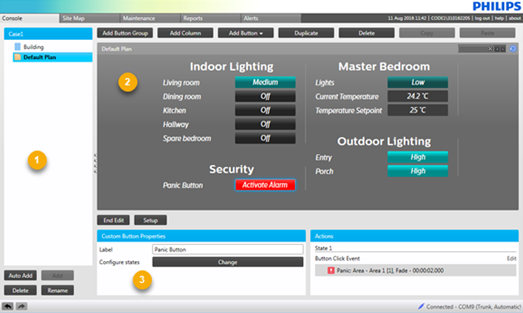
Creating and Editing Pages

| The options below are only available to user roles with Write Button permission. |
Use the buttons at the bottom of the Page Tree to make changes:
-
Auto Add creates and populates a page for each floor plan in the System Builder job file.
-
Add a blank page.
-
Delete the selected page.
-
Rename the selected page.
-
Add folder to separate groups of pages.
Controlling the building
Buttons for building-wide functions are created in the Building page. You can add buttons to this page manually, or automatically using the setup wizard.
Controlling each floor
After Auto Adding pages to the Page Tree, each floor’s page is populated with buttons only for that specific floor.
Search for text on a page by typing into the Search box in the top right corner of the Console. Click the arrow buttons to find the previous or next occurrence of the text.
Editing the Page
Click at the bottom of the Console to enter Edit mode. From here, you can select any group or button to access its properties, or click anywhere on the page background to access the Button Page Properties.
To save your changes and exit Edit mode, click the button.
Changing the Page Background
Each page’s background image and color can be customized for branding, navigation, or readability.
-
In Button Page Properties, click to select a Background Image.
-
Drag the Opacity slider to adjust the transparency of the image over the Background Color.
-
Select the Background Color by clicking on the dropdown menu.
-
Select the Image mode (all modes are center/middle-aligned):
-
Uniform Fill – Fills the frame, cropping vertically/horizontally to preserve the aspect ratio.
-
Uniform – Resizes to the height/width of the frame (whichever is closer).
-
Stretch – Changes the image aspect ratio to fill the frame.
-
Center – Centers in the frame at original size.
-
Fixed – Fixes to the center of the page (not the frame) and resizes to the height/width of the page (whichever is closer).
-
|
Once added, the background can only replaced with another image, not removed. To hide the image, drag the Opacity slider to 0.00. |
Adjusting Button/Group Layout
Select a Layout control option:
-
Fill wrap panel– Automatically arranges rows of button groups in the available space. -
Grid– Arranges button groups in a customizable fixed grid:-
Number of columns/rows
If there are more button groups than grid squares, SM automatically adds extra rows.
-
-
Padding Left/Right - between labels/buttons sides of group
-
Padding Center - between each column of labels/buttons
-
Vertical Spacing - between each row of labels/buttons
-
Padding Top/Bottom - between group rows
-
Margin Left/Right - between group columns