Setting Time Zone And Real-Time Clock
The EG’s internal astronomical clock enables advanced scheduling of system actions and automated tasks based on time of day or sunrise/sunset. You can find the settings for this feature under Device Properties > Real-Time Clock.
When first connecting to the device, it is important to set schedules and logs to the correct time zone and local time.
-
The time zone may be set for the whole job or for an individual device and must be saved to the device. When pre-commissioning devices, be aware that you may need to configure devices for the time zone of the site.
-
Local time may be set for the whole job or for an individual device and is synchronized immediately without having to save to device. The local time must be set again if a device is factory reset.
-
Either:
-
For System Builder: From the toolbar, click Tools >
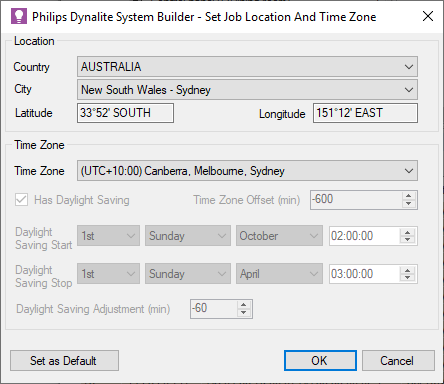
 Set Location and Time Zone.
Or:
-
For an individual EG: Right-click the EG and select
 Set Location and Time Zone.
-
-
Select the Country from the dropdown list.
-
Select the City from the dropdown list.
-
Click the button.
-
Click
 Save to Device.

| For a city/town that is not listed, enter custom latitude/ and longitude in Degrees, Minutes and Seconds to help with accurate calculations of sunrise and sunset times. |
System Builder cannot set the time zone from coordinates. To set a custom latitude and longitude as the site location, first complete the above procedure with any Country/City that matches the site’s correct time zone, then follow the steps below:
-
Reopen the
 Set Location and Time Zone dialog.
 -
In the Country dropdown, select Custom (this is the first option at the top of the list).
-
Enter the site’s DMS Latitude and DMS Longitude.
-
Click the button.
-
Click
 Save to Device.
-
Either:
-
For System Builder: From the toolbar, click Tools >
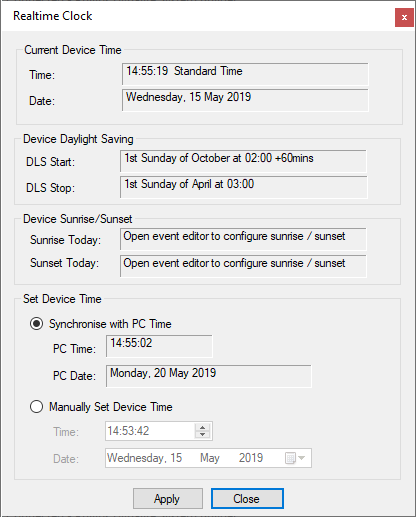
 Set Realtime Clock for all Devices
Or:
-
For an individual EG: Right-click the EG and select
 Set Realtime Clock.
-
-
Under Set Device Time, select either:
-
Synchronize with PC Time.
Or:
-
Manually Set Device Time. Enter the time and date.
-
-
Click the button to save your changes, then click the button to exit.

| For more information, refer to Device Properties > Real-Time Clock. |