Template Library Concepts
Hotel guestroom projects are among the most complicated Dynalite projects you will ever do. Manually commissioning all the devices and tasking from scratch, and then testing all the interactions between the various features, would take weeks. Device configuration can also be quite complicated in a Multiroom project.
To reduce the commissioning burden on these projects we have created the STR Template Library, a System Builder file populated with a variety of preconfigured devices and task templates. Our goal is to reduce the commissioning time to deploy a Multiroom project down to several hours. You should use this file as your starting point for configuring the model room.
| Although task templates do reduce commissioning time substantially, some knowledge of Dynalite tasking is still required to customize the project to each customer’s needs. |
Downloading the STR Template Library
The latest version of the STR Template Library is available from the Dynalite Support site. The library download is in a zipped folder, along with a changelog and several assets to aid in commissioning and testing.
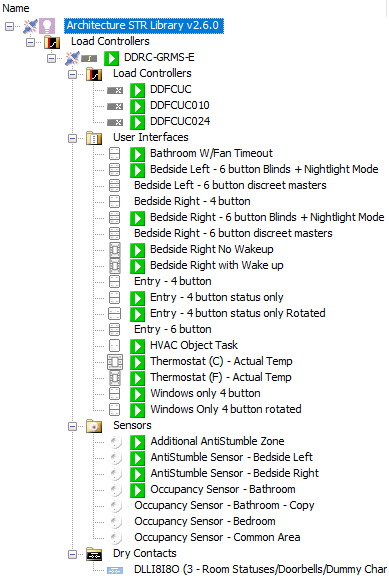
Preconfigured Device Templates
The STR Template Library contains many preconfigured devices with their recommended settings and task templates.
The primary device in this network list is the GRMS controller, which contains the main task template. This template is mandatory and provides almost all the features that make Multiroom work. The GRMS will also have recommended settings for things like dry contacts.
The file also contains many user interfaces with common configurations. Delete any unnecessary devices, then add any additional devices under the GRMS.
Logical Architecture
Although there is some flexibility as to which areas to use in a Multiroom project, several areas are hard-coded in the dashboard, tasking, and hardware, and cannot be changed. Modifying the default areas can make support and troubleshooting more difficult and time-consuming.
Of the 20 areas allocated to a standard room, there are about 10 left for lighting areas while the rest are used for other devices and functions. Areas reserved for HVAC or window coverings can be reallocated to lighting if they are not needed.
| Number | Name | Description |
|---|---|---|
2 |
Occupancy Area |
Dummy area used by sensors to determine occupancy |
3 |
Status Area |
Area for room status messages and individual non-lighting loads like doorbells, indicators, and dummy channels. |
4 |
Power Only |
Area for items that are controlled purely through occupancy and have no way for a guest to control them, including locally switched lights, coffee makers, TVs, etc. |
5 |
Night Lights |
Area for automated nightlights. Can be repurposed if no nightlights. |
6 |
Window Coverings 1 |
Area for all blackout curtains and blinds. |
7 |
Window Coverings 2 |
Area for all sheer curtains and blinds. |
8-15 |
Lighting Areas |
Areas for lighting control. |
16 |
Lighting BLA |
Base Link Area for all lighting control. |
17-19 |
HVAC Areas |
Areas for HVAC control. |
Room-Only Areas
Sometimes there is traffic within a room that we do not want to go on the trunk, e.g. dummy area messages that trigger specific local functions.
To keep these messages within the room, we can use any area that is higher than the filtering allows (Typically 20).
For most of these room-only messages we use areas 200-255.
| Using areas outside the allotted offset generates a logical translation error on the device in System Builder. It is safe to ignore these errors as you are purposely using areas blocked by the filter. |
| Number | Name | Description |
|---|---|---|
200 |
Wake-Up Display Area |
Dummy area used by the alarm clock tasking on a bedside display. |
201 |
Dummy Trigger Area |
Area for dummy messages within a room for one device to trigger others. |
202 |
HVAC Event Area |
Dummy area for triggering HVAC events like Guest Entry. |
217-219 |
FCUC Areas |
Areas for the FCUCs to operate in. |
Base Link Areas
To reduce network traffic, three areas are used to control a large number of devices. This allows us to use the Save/Restore Preset commands to control many things with a single command. It also allows us to send one classic preset message to a single area, updating all devices in that area.
Area 16 is the Lighting Base Link Area (BLA). All lighting channels, UI buttons, and integrations need their BLA set to area 16.
Although not BLAs, it is also important to note areas 6 & 7 which are used for window coverings:
-
All primary window coverings (usually blackouts) should be individual channels in area 6.
-
All secondary window coverings (usually sheers) should be individual channels in area 7.
| Area 16 (Lighting BLA) and areas 6 & 7 (Window Coverings 1 & 2) are hard-coded into the main GRMS task template. These areas must be assigned correctly to ensure that the GRMS can update and resume lighting and window covering functions. |
Global Areas
We recognize the need for global messages that can reach every room in a project. Rather than sending individual messages to hundreds or even thousands of rooms, we use Global Areas.
When configuring room controllers and floor gateways in a Multiroom project, you need to leave a 'hole' in the filtering to allow messages for areas 65,000-65,005 to pass through to every room.
Area 65,000 is allocated to time-of-day messages, with P1 for 'Day' and P4 for 'Night'. The rest are available to use for whatever global messages you may need.